Editorial Workflow for Sizing and Uploading Images
I’ve posted previously about my Pythonista workflow for resizing and uploading images to my FTP host for Macdrifter.1 I translated this workflow for Editorial but decided that wasn’t much of a challenge.
I rewrote the workflow to upload to the Macdrifter host by SFTP. This had a number of interesting quirks but if you just want to download the workflow and figure it out, you can get it here.2
The workflow has two options:
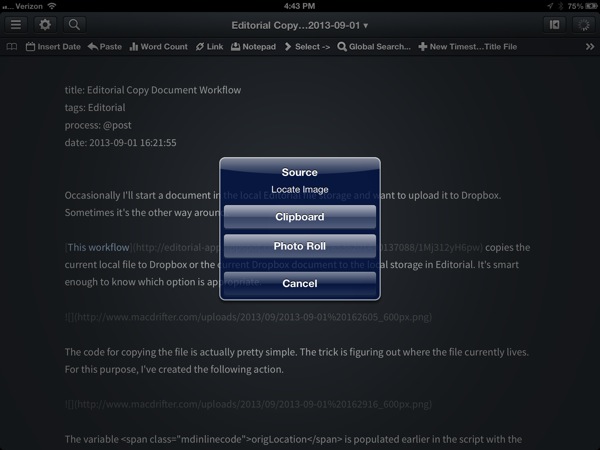
- Choose an image from the camera roll and upload
- Take an image from the clipboard and upload

If you want to use an image from the camera roll, Editorial provides the standard image picker.

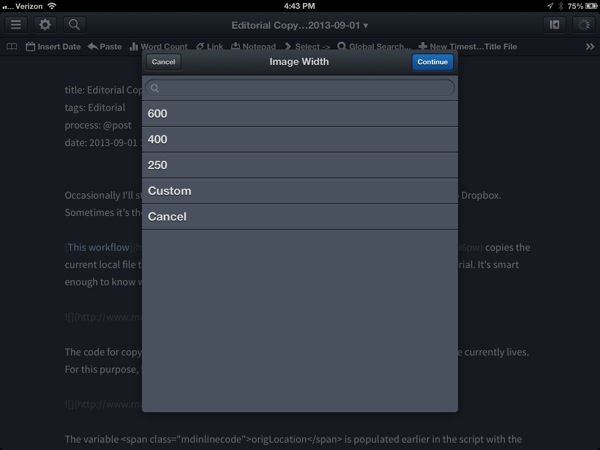
After selecting the image, there’s a list of resizing options. I have a couple of my standard image width sizes plus an option to enter a custom width. The image is then resized proportionally to fit the selected width.

The workflow also asks for a file name and appends the current timestamp to the end before uploading to the appropriate web server location.3 The timestamp helps to avoid overwriting an existing file with the same name during upload. I also like timestamps in file names.
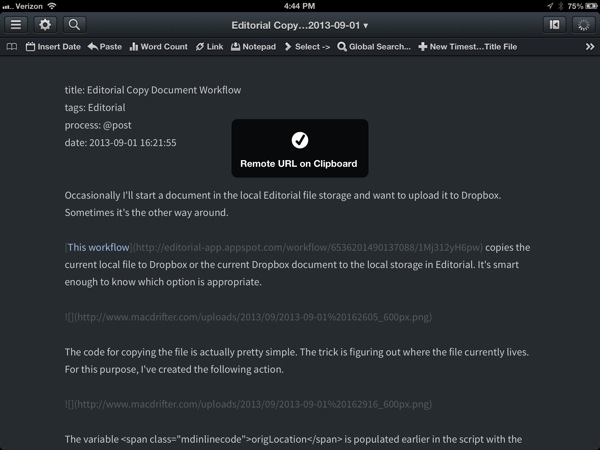
After the file is uploaded, we get a confirmation and the URL for the hosted image on the clipboard.

I’ve also chosen to put a bit of information on the console. This might be annoying to some, but I like having the running history. I’m displaying the resized dimensions, the image and the URL to the hosted image.

Now, if you want to learn how this awesomeness happens in Editorial, read on. This post is really just an excuse to demonstrate how to use Python inside Editorial.4
Simple File Transfer with Paramiko
The heart of this workflow is the Paramiko module, which is a very good SSH module. I used this module in my other SFTP workflow for uploading text documents. This module comes with Editorial and Pythonista.
In the previous SFTP workflow, the upload was accomplished with the following bit of code:
:::python
transport = paramiko.Transport((host, port))
transport.connect(username=user, password=pw)
sftp = paramiko.SFTPClient.from_transport(transport)
#sftp.chdir(remote_path)
sftp.put(remotepath=remote_path+file_name+'.md', localpath=file_path)

sftp.close()
transport.close()
console.hud_alert(file_name + '.md uploaded', 'success')
I think that’s really cool. The sftp.put(remotepath, localpath) method just does a simple file transfer from one location to another. Easy-peasy.
But this workflow is a bit harder. Where is the image on the clipboard or camera roll stored? We’d need a file path if we wanted to use the put() method. Maybe there’s a better way.
Byte Buffer Transfer with Paramiko
One way to work with files without storing them in the file system is to create a file in-memory with BytesIO from the IO module. This lets us store a non-text file in memory as a binary object and use it like it’s a real file. One problem though. There’s no file path that we can use with the put() method.
The benefit of working through Paramkiko is that it’s really an SSH connection in disguise. That means we can do some useful file operations like opening and writing files.
Before getting into the details, here’s the full python script:
:::python
#coding: utf-8
import workflow
import Image, ImageOps, ImageFilter
import console
import clipboard
import datetime
from io import BytesIO
import urllib
import editor
import keychain
import pickle
import paramiko
import photos

#keychain.delete_password('macdrifter', 'editorial')
login = keychain.get_password('macdrifter_ssh', 'editorial')
if login is not None:
    user, pw = pickle.loads(login)
else:
    user, pw = console.login_alert('FTPS Login Needed', 'No login credentials found.')
    pickle_token = pickle.dumps((user, pw))
    keychain.set_password('macdrifter_ssh', 'editorial', pickle_token)


width_selection = workflow.get_variable('widthSelection')
source_selection = workflow.get_variable('source')


host = "myhost.com"
port = 22
url_base = "http://myhost.com/uploads/"
remote_path = "/actual/remote/file/path/to/upload/"

if source_selection == 'photo':
    image_selection = photos.pick_image()
else:
    image_selection = clipboard.get_image()
    if not image_selection:
        console.alert('No Image', 'Clipboard does not contain an image')


today = datetime.datetime.now()

file_name = console.input_alert("Image Title", "Enter Image File Name")
file_name = file_name+'_'+today.strftime("%Y-%m-%d-%H%M%S") +'.png'


date_path = today.strftime("%Y/%m/")
# Used to create full remote file path
remote_date_path =  remote_path + date_path


def customSize(img, new_width):
    w, h = img.size
    if w > new_width:
        wsize = float(new_width)/float(w)
        hsize = int(float(h)*float(wsize))
        img = img.resize((new_width, hsize), Image.ANTIALIAS)
        print str(new_width)+'w X '+str(hsize)+'h'
    else:
        print 'Image not resized. Width less than '+new_width
    return img

image = customSize(image_selection, int(width_selection))
image.show()


buffer = BytesIO()
image.save(buffer, 'PNG')
buffer.seek(0)


file_url = urllib.quote(file_name)


try:

    transport = paramiko.Transport((host, port))
    transport.connect(username=user, password=pw)
    sftp = paramiko.SFTPClient.from_transport(transport)
    #sftp.chdir(remote_path)
    f = sftp.open(remote_date_path+file_name, 'wb')
    f.write(buffer.read())
    f.close()

    sftp.close()
    transport.close()
    console.hud_alert(file_name + ' uploaded', 'success')

except Exception, e:
    print e
    console.alert('Error', e)

image_link = url_base+date_path+file_url
print(image_link)
clipboard.set(image_link)
console.hud_alert('Remote URL on Clipboard ', 'success')
Now back to the little trick of writing a file from memory onto the remote host.
We really just need to do two things:
- Create a new file
- Save the in-memory binary data into the file
This requires two lines:
- f = sftp.open(remote_date_path+file_name, ‘wb’)
- f.write(buffer.read())
Pretty neat. The open() method creates a new file at the indicated path and file name ready to receive some binary data. Conveniently we had a binary object in memory to stuff in there.
Now that we know how to do the really tricky bit, let’s backup and checkout some of the other tricks in this workflow.
Getting the Image
This workflow lets us transfer an image from either the clipboard or camera roll. Editorial accesses the camera roll through the Photos module. It’s really just one line to show the photo picker and grab the image object the user selects:
:::python
image_selection = photos.pick_image()
The alternative is to get an image off of the clipboard. This is almost as easy but we don’t want to trust that there is really an image on the clipboard so we do a little test:
:::python
image_selection = clipboard.get_image()
    if not image_selection:
        console.alert('No Image', 'Clipboard does not contain an image')
Take a look at my previous workflow for viewing the clipboard. It has all the explanation.
Resizing the Image
I wanted the option to use a couple of standard image sizes. I typically resize images to a specific width. To allow multiple options I use the pop-up selection list available in Editorial and save the selected value to a variable.
The list selector is a nice way to provide a variety of choices without displaying really ugly popups.
Once we have the image, we just need to do some basic math to proportionally resize it. I do this enough that I have a method I reuse in a variety of scripts:
:::python
def customSize(img, new_width):
    w, h = img.size
    if w > new_width:
        wsize = float(new_width)/float(w)
        hsize = int(float(h)*float(wsize))
        img = img.resize((new_width, hsize), Image.ANTIALIAS)
        print str(new_width)+'w X '+str(hsize)+'h'
    else:
        print 'Image not resized. Width less than '+new_width
    return img
This is pretty straight forward once you appreciate that an image object has a width and size property available through image.size.
After we have the image’s actual size we just need to figure out how to proportionally downscale it. I never want to upscale my images so I only resize if the current image width is larger that the new requested width.
The Imaginary File
Perhaps the most interesting part of this script is how it creates an in-memory file object:
:::python
buffer = BytesIO()
image.save(buffer, 'PNG')
buffer.seek(0)
The BytesIO() method creates a place in memory that holds a file.
Next, we tell our image, conveniently saved in the image variable, to save to this in-memory file object as a PNG. Finally, we tell the file object to reset it’s current read/write position to the beginning of the file using buffer.seek(0). This way when we start reading from our file object we know we will start reading from the beginning.
That’s pretty much it. The rest is just some date manipulations to make sure we are uploading to the write directory and to create the URL to the hosted file. There’s not much interesting in there.
Conclusion
This post is self serving. By highlighting some of the interesting Editorial modules and Python tricks, I’ll get others to make even more powerful workflows for me to steal.
-
Jason Verley has a related post where he uses a modified FTP upload workflow. Be sure to check it out. ↩︎
-
This stuff has no warranty. There’s error handling for the common boneheaded stuff I know I’ll do, but there’s not nearly enough error handling for all of the boneheaded stuff everyone could do. If you tweak it or improve it, let me know. I’ll add the workflow to my Pinboard links for Editorial. ↩︎
-
My hosted images are stored according to the year and month. So this months images are stored in /uploads/2013/09/. ↩︎
-
I’m not a CS instructor. I’m not even really a professional programmer. I’m a dude with a computer and a compulsion to scratch itches. Somethings will definitely be wrong. I apologize in advance. If you’re just here to criticize style and jargon without contributing something cool, remember that everyone is an amateur until they are not. When they are not they kind of don’t care about piddly crap. I do, however, like kindly advice and input. ↩︎
