Replacing TapCellar with Text Files
This is a long and tedious post. It’s not really about beer, rather it’s about:
- Text files
- Note taking
- Python scripting
- DEVONthink
- Keyboard Maestro
- Beer
Ok. It’s a little bit about beer. Let’s start this story already…
I miss TapCellar, the iOS beer tracking app I helped make. It was my favorite app. But, we killed it because we are not idiots with bottomless bank accounts and free time. I still want a way to track the beers I like but I need a social platform like a I need a hole in my liver. One of the key design elements of TapCellar was that users owned their data and it was totally portable as a JSON file. I’m really appreciating that now, but a single JSON file isn’t a great way to keep notes so I needed a way to make something more useful.
The Ground Rules
First off, I wanted the new system to be completely portable. Text files are an obvious fit for basic documentation. If I have 1200 text files I can simply drop them in DEVONthink and they sync to my Mac and iOS devices. But I can also drag them out again unaltered.
The core of the new system is plain text files. The files have YAML headers to capture the basic elements of a good (or bad) beer, like the brewery, beer name, alcohol content, etc. I also want my individual tasting notes to show up in the body of the text. I want each text file to be named with the beer name, brewery, and a vintage if it’s know. This gives me an easily identified text file for each beer. A file looks something like this:
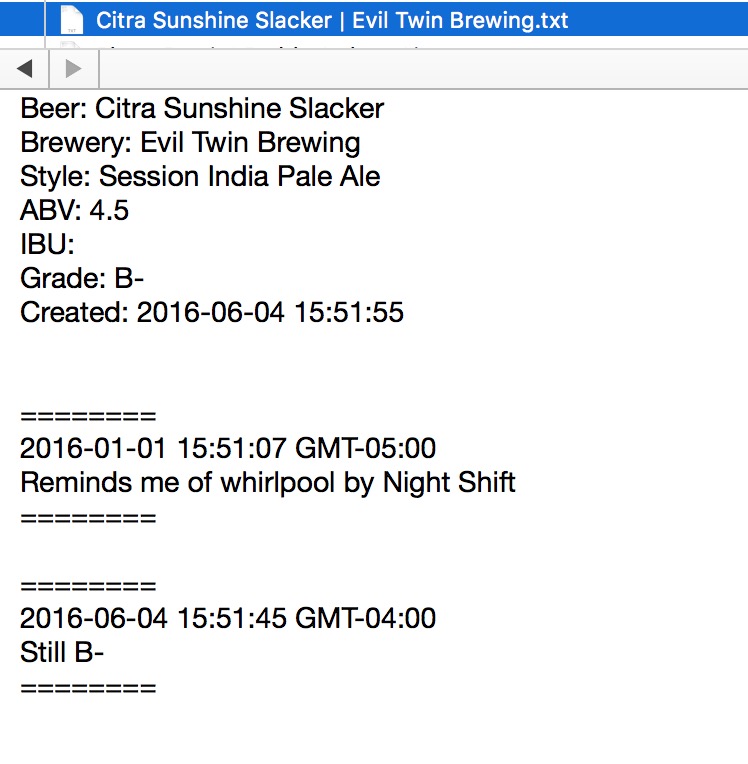
It’s not pure Markdown but it’s perfect for my needs.
What’s Better than Text?
All of this text is pretty easy to search but it’s not as flexible as a database. For example, I can’t do complicated searching to find all beers rated greater than a B that I drank in the last year. That’s a trade-off I’m willing to make for extremely fast capture.
One advantage of doing this in DEVONthink instead of just a plain text editor like Editorial is that DEVONthink can hold pretty much anything and I can apply tags, labels, and SpotLight comments. Tags show up in list browsers and have their own special groups for quick access. One thing that always annoyed me with TapCellar was that even with the barcode scanning and quick searching it still took too long when I really just wanted to snap a picture and go back to having a good time. With DEVONthink I can do just that.1
The example below was from a lovely trip to Haw River. I mostly wanted to just enjoy a beer and a chat with my friend. But I really wanted to remember what we tried. So I took a photo and moved on.
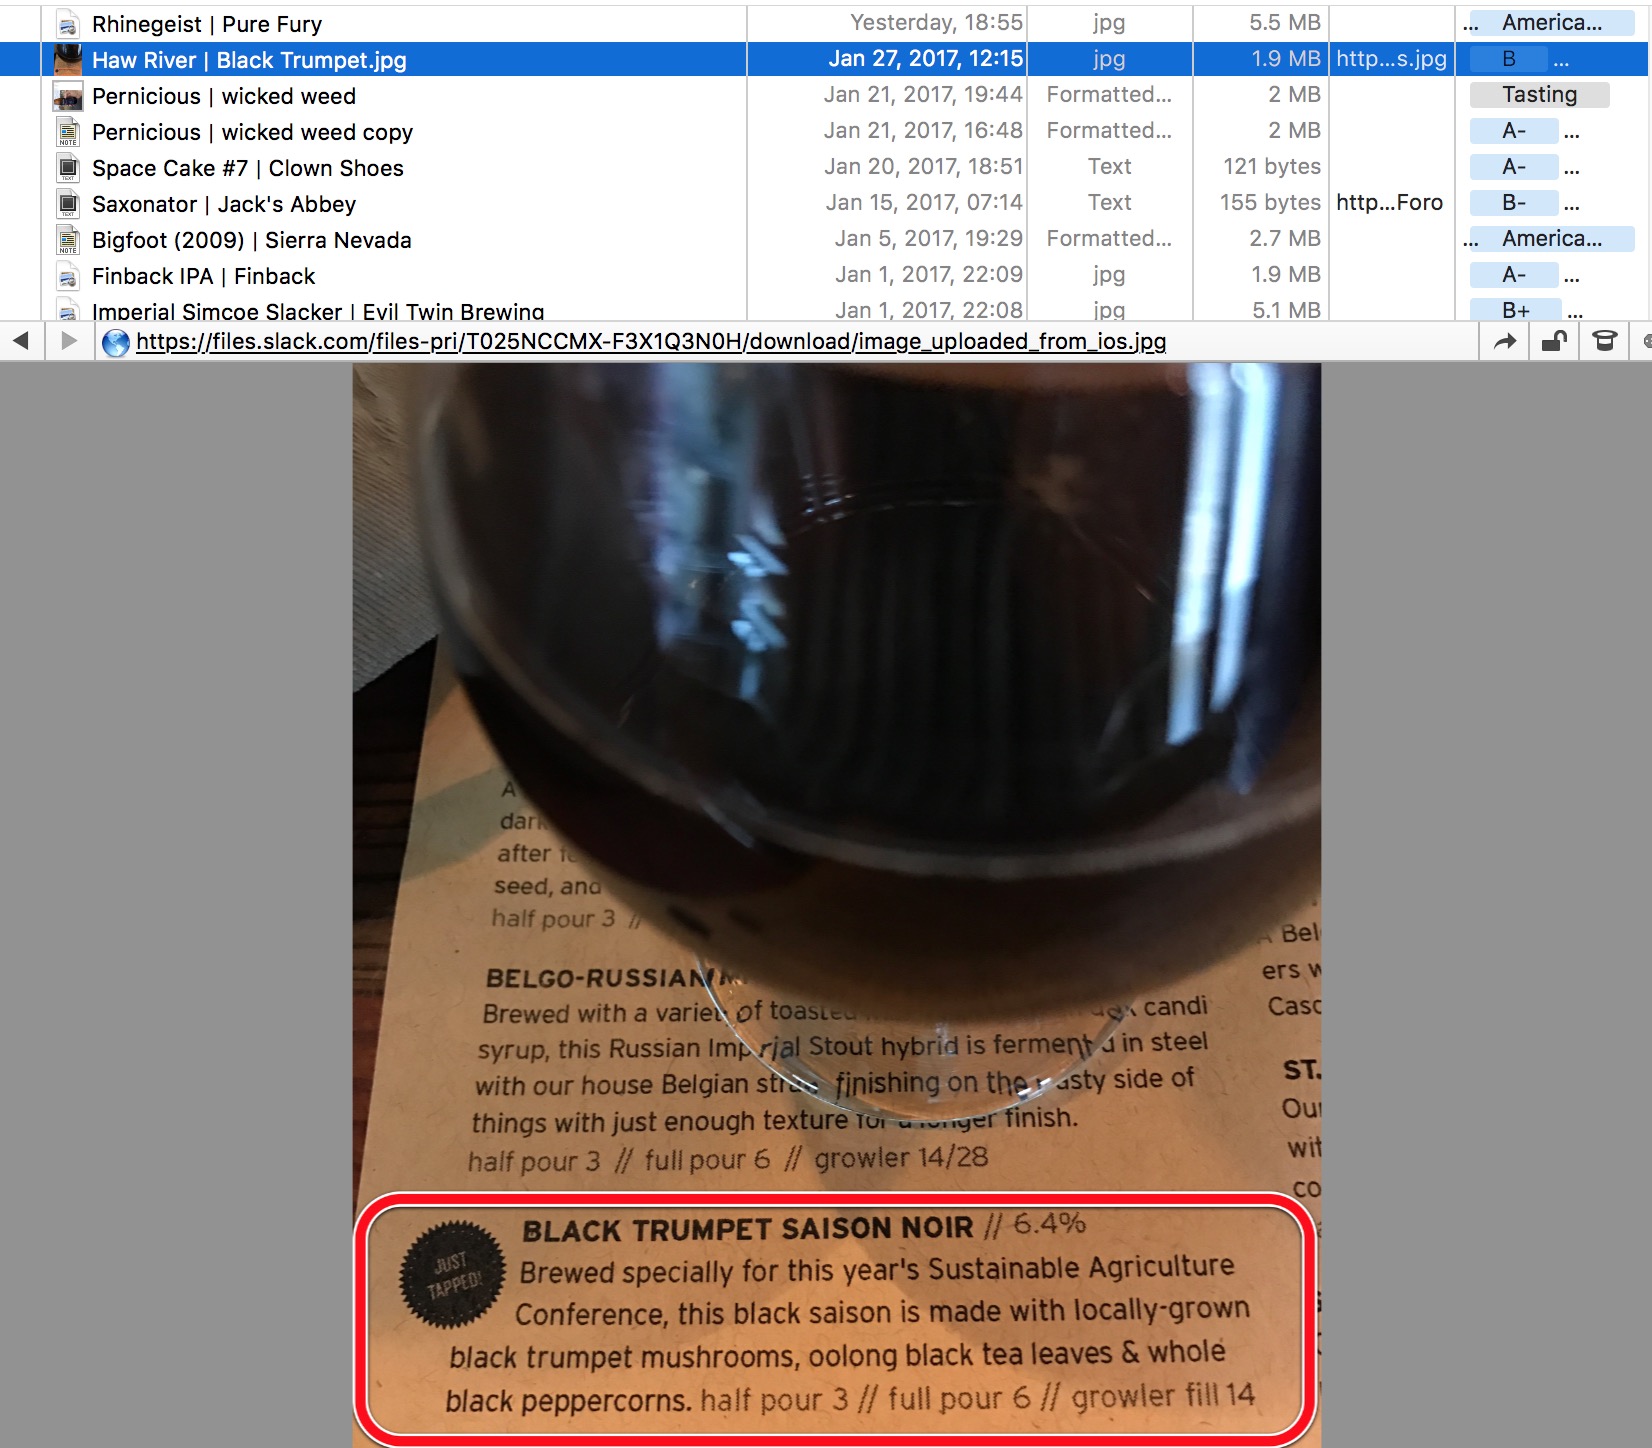
When I take the photo with DEVONthink to Go I add tags for the style and the grade I give the beer. That’s pretty much all I need at the moment. Tag completion makes this very fast. Back on my Mac I have some extra options. I can convert the image to a searchable PDF with very little effort.
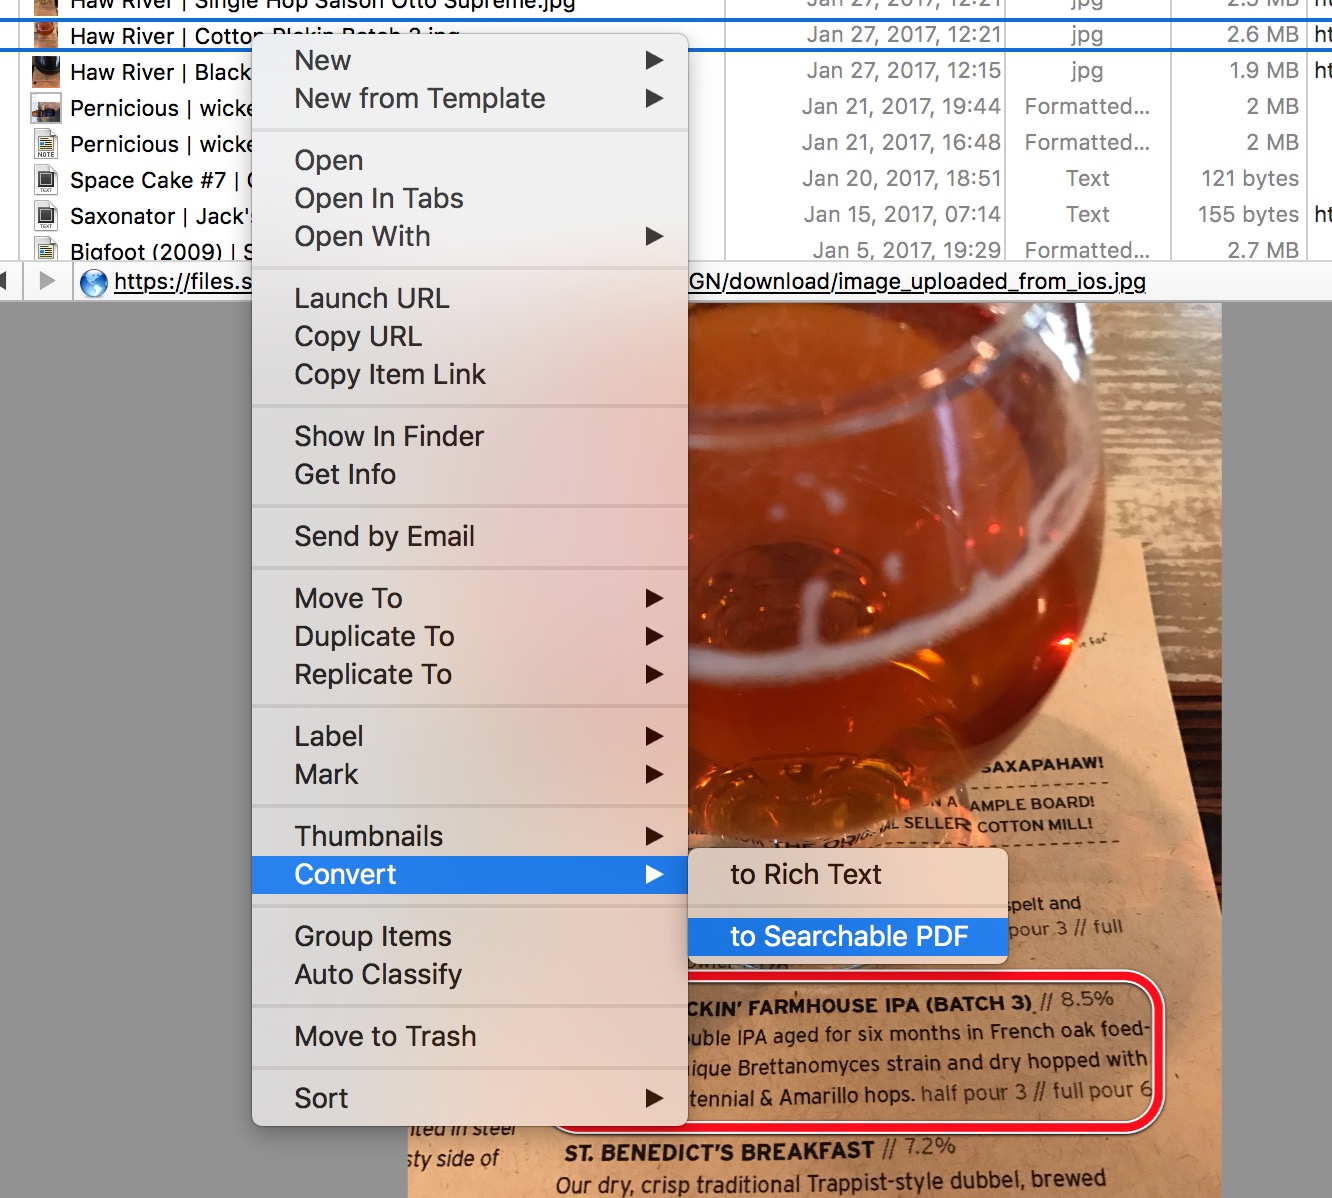
Formatted Notes in DEVONthink are like Apple Notes. They allow for embedding an image along with text. DEVONthink stores these as HTML. This is a pretty good way to make complex notes but I find that it takes too much time on iOS. Instead I create a text file with the notes and an image file for the photos. I name the files with the brewery and beer name. Search still works well. Plus on the Mac I can see related files automatically. It’s a simple solution that’s infinitely flexible.
Extracting the JSON
The TapCellar export is a JSON file that contains all user records. Each record can contain multiple tasting notes and I want all them. The basis for the Python script is pretty simple. It reads a JSON file, extracts a bunch of data for each record and creates a text file for each one. The script also sets the modification and creation dates to match the original record in TapCellar.
Here’s the entire script. It’s a bit top heavy in that I import a ton of junk because I’m lazy and I used this script for a lot of experimentation. For example, Pandas is not really necessary for processing JSON but it’s very easy to use and I can do a lot more things with it like convert JSON to CSV. I’m sure it can easily be replaced if you are so inclined. Keep in mind that I don’t plan to use this script more than once. After the JSON is converted to text files I’ll never run it again.
::: Python
#!/usr/bin/python
import pandas as pd
import os
from datetime import date
import time
from datetime import datetime
from dateutil import parser
import codecs
import subprocess
import sys
reload(sys)
sys.setdefaultencoding("utf-8")

beerData = pd.read_json("/Users/weatherh/Desktop/File- Sep 20, 2016, 4-51-50 PM EDT/TapCellarBackup.json");
def gradeLookup(grade):
	if grade <= 0:
        return "Not graded"
	elif grade >= 3.8:
        return "A+"
	elif grade >= 3.47:
        return "A"
	elif grade >= 3.14:
        return "A-"
	elif grade >= 2.81:
        return "B+"
	elif grade >= 2.48:
        return "B"
	elif grade >= 2.15:
        return "B-"
	elif grade >= 1.82:
        return "C+"
	elif grade >= 1.49:
        return "C"
	elif grade >= 1.16:
        return "C-"
	elif grade >= 0.83:
        return "D+"
	elif grade >= 0.50:
        return "D"
	elif grade >= 0.17:
        return "D-"
	else:
        return "F"
for beerRecord in beerData.tapcellarbeers:
	beerBrewery = beerRecord.get('breweryname')
	beerVintage = beerRecord.get('vintage')
	if beerVintage == "0":
        beerVintage = ''
	else:
        beerVintage = "("+beerVintage+")"
	beerCreation = beerRecord.get('createddate')
	beerName = beerRecord['beername'].encode('utf8')
	beerStyle = beerRecord.get('style', "N/A").encode('utf8')
	beerAbv = beerRecord.get('abv', "N/A").encode('utf8')
	cellarCount = beerRecord.get('cellarcount', "N/A").encode('utf8')
	beerIbu = beerRecord.get('ibu', "N/A").encode('utf8')
	beerGrade = gradeLookup(float(beerRecord.get('grade')))
	beerDate = beerRecord.get('editdate')

	# Create date object so we can set the modification date later
	datetime_object = parser.parse(beerDate)
	beerFormatDate = datetime_object.strftime('%Y-%m-%d %H:%M:%S')

	# Convert to timestamp in seconds since epoch so we can use the integer for the file create date
	fileTime = time.mktime(datetime_object.timetuple())

	tastingNote = ""
	tastingArray = beerRecord.get("tastings","")
	if tastingArray:
        for tasting in tastingArray:
            tastingNote = tastingNote+"\n========\n"+tasting['timestamp']+"\n"+tasting.get('comment',"")+"\n========\n"
	# Create the file name but remove any slashes that might be a problem
	filename = "/Users/weatherh/Downloads/TastingFiles/"+str(beerName.replace("/", ""))+beerVintage+" | "+str(beerBrewery)+".txt"
	fileText = "Beer: %s\nBrewery: %s\nStyle: %s\nABV: %s\nIBU: %s\nGrade: %s\nCreated: %s\n\n%s" % (beerName, beerBrewery, beerStyle, beerAbv, beerIbu, beerGrade, beerFormatDate, tastingNote)
	if not os.path.exists(filename):
        with codecs.open(filename, "w", encoding="utf-8") as text_file:
            text_file.write(fileText)
        os.utime(filename, (fileTime, fileTime))
	else:
        print 'File exists. Skipping ' + filename
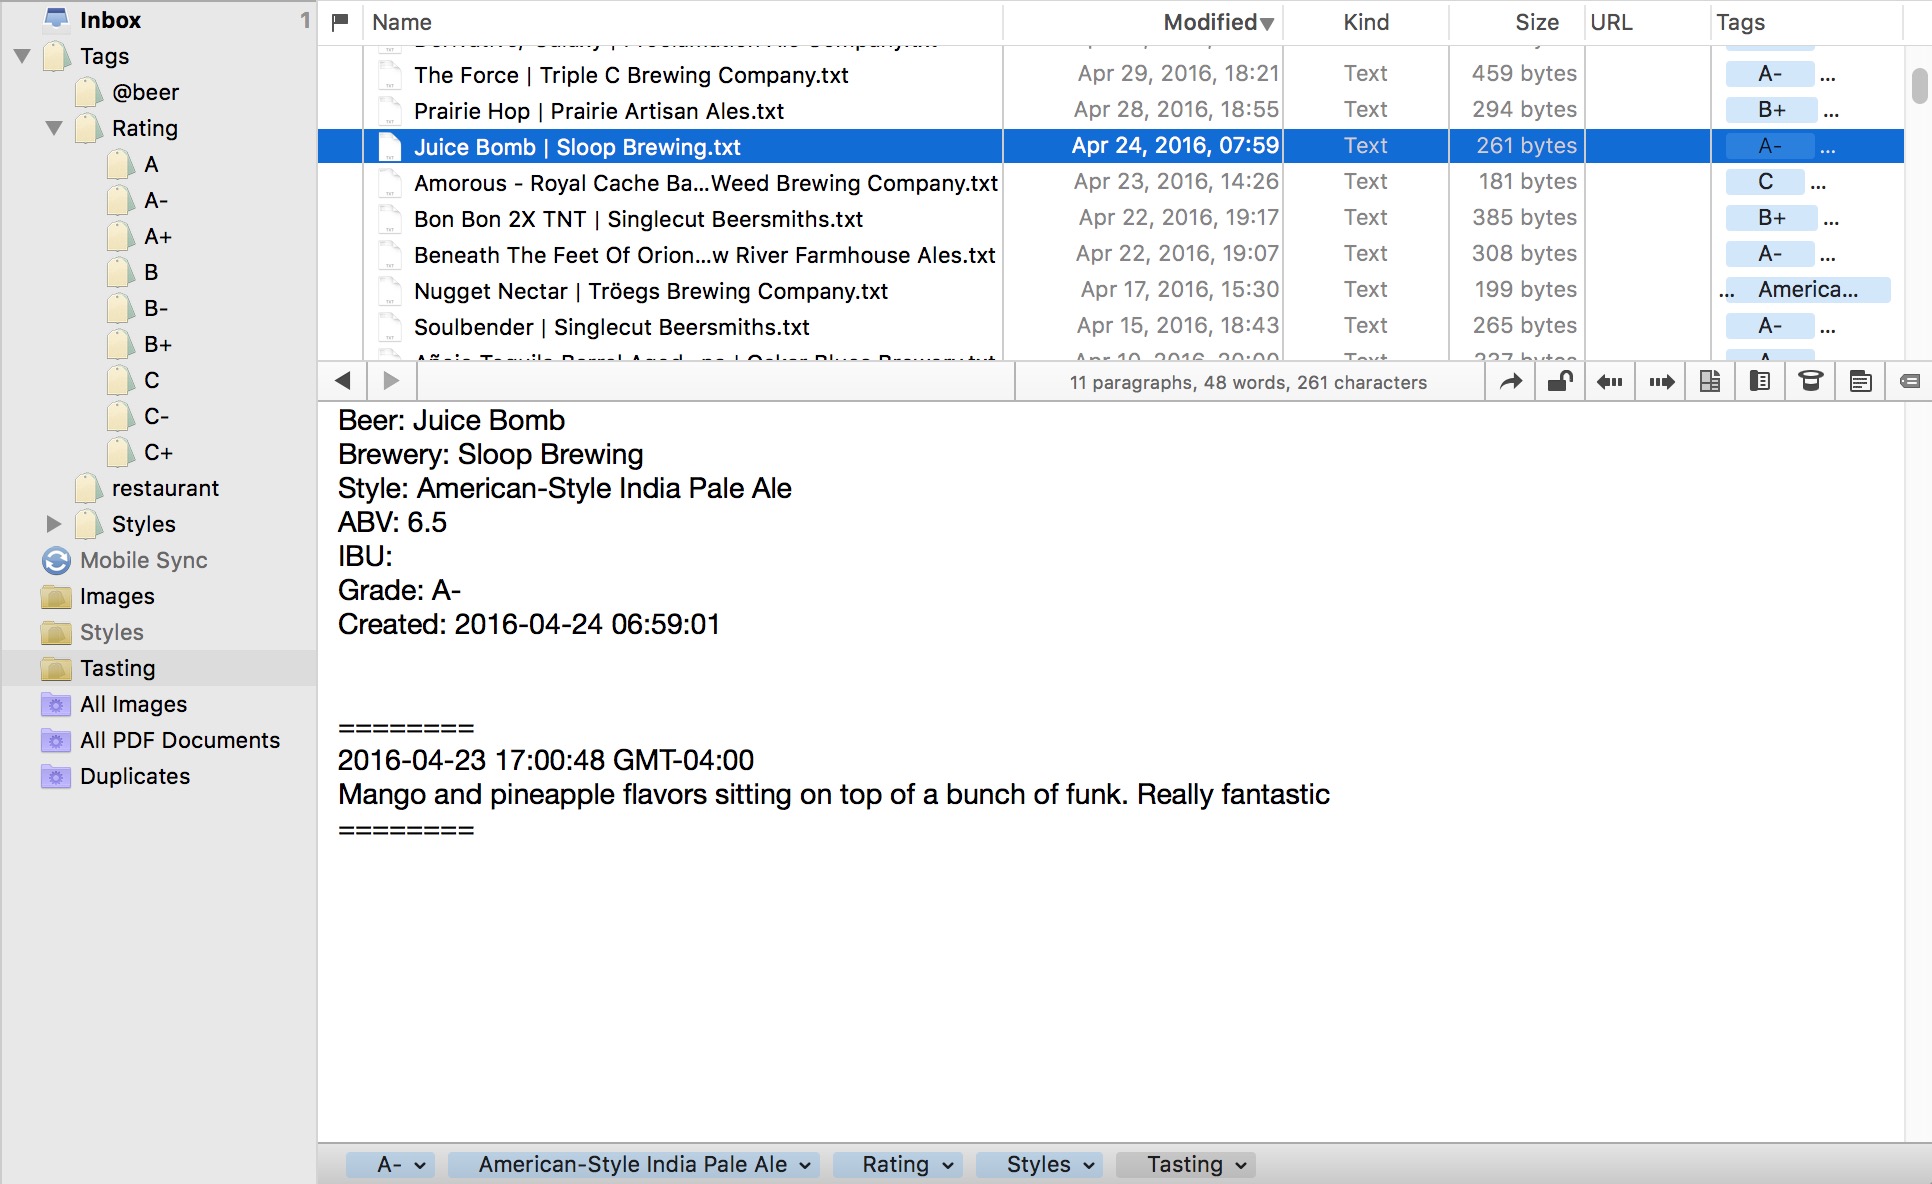
After running this script I end up with a folder full of text files.
Just a quick summary of what’s going on in this script. I’m reading in the JSON file with Pandas from my local TapCellar export on my desktop and saving that into a variable named “beerData”.
:::Python
beerData = pd.read_json("/Users/weatherh/Desktop/File- Sep 20, 2016, 4-51-50 PM EDT/TapCellarBackup.json");
Next up I have a function named “gradeLookup(grade)” gleefully stolen from my pal Terry. This function accepts the decimal value TapCellar uses for grades and returns the appropriate letter grade for the score.
The last half of the script is a giant drunken for-loop. This loop looks at each JSON record in the Pandas object. The loop looks for all the attributes I care about. For some of them, if they don’t exist, I set a them to an empty string or to “N/A”.
One note here about retrieving values. Here’s a pretty standard way to get the value of a JSON attribute using Pandas. I make sure to encode it as utf8. I don’t know why I need to do this because character encoding is voodoo to me. I just know I got tired of random unexplainable errors and bludgening every string I get to make it utf8 seemed to work.
:::Python
beerName = beerRecord['beername'].encode('utf8')
But a better way to get a value from JSON is to use the “get” method which has one major benefit: You can declare a default value if there attribute doesn’t exist or is null. In this case I set the value to “N/A” if there’s no style set for the beer.
:::Python
beerStyle = beerRecord.get('style', "N/A").encode('utf8')
When I read the record date, I get a string back. But I really want a time stamp I can reformat and use to set the creation date of the file later. I do that with the datetime and dateutil modules.
:::Python
datetime_object = parser.parse(beerDate)
beerFormatDate = datetime_object.strftime('%Y-%m-%d %H:%M:%S')
For setting file creation dates on the Mac I need a time in seconds since epoch. I use the Python time module for that.
:::Python
fileTime = time.mktime(datetime_object.timetuple())
There’s a little trick near the end where I handle the tasting notes. There can be multiple notes on a beer record, so if the tasting note is an array, I then loop through that and append them all together with separators.
The script creates the file name using the brewery and beer name followed by the vintage. Note that I remove any slashes from the beer name since some brewers are a little cheeky when they name their beers.
:::Python
filename = "/Users/weatherh/Downloads/TastingFiles/"+str(beerName.replace("/", ""))+beerVintage+" | "+str(beerBrewery)+".txt"
fileText = "Beer: %s\nBrewery: %s\nStyle: %s\nABV: %s\nIBU: %s\nGrade: %s\nCreated: %s\n\n%s" % (beerName, beerBrewery, beerStyle, beerAbv, beerIbu, beerGrade, beerFormatDate, tastingNote)
The final two processes are creating the text file and sets the creation date.
:::Python
if not os.path.exists(filename):
	with codecs.open(filename, "w", encoding="utf-8") as text_file:
        text_file.write(fileText)
	os.utime(filename, (fileTime, fileTime))
else:
	print 'File exists. Skipping ' + filename
Tags
This is where I encountered some trouble. I wanted the style and grade to be prominent on the records and to be used for filtering. The best option for DEVONthink was to use tags. I tried like for several hours to use a known method with python to set macOS tags. While the tags looked fine in the Finder, importing them into DEVONthink caused some issues with indexing and display. The tags were NOT fine.
Now at this point, my little one-off script had become a part-time job. I really just wanted to process hundreds of Markdown files. I really didn’t want to go back to the drawing board. So I realized that I had YAML headers in every file that contained the information I needed. The Markdown package for Python is perfectly good at pulling out YAML attributes in files but the Python way of setting macOS tags stunk. What other scripts could I use to set tags on files? Well, I have Keyboard Maestro. Eureka!
Keyboard Maestro (KM) is quite a utility. Even the most hardened and terrifying Mac nerd can learn to love Keyboard Maestro. In my case I wanted to take advantage of Keyboard Maestro’s action for setting macOS tags and it’s ability to process a group of files. The macro is short.
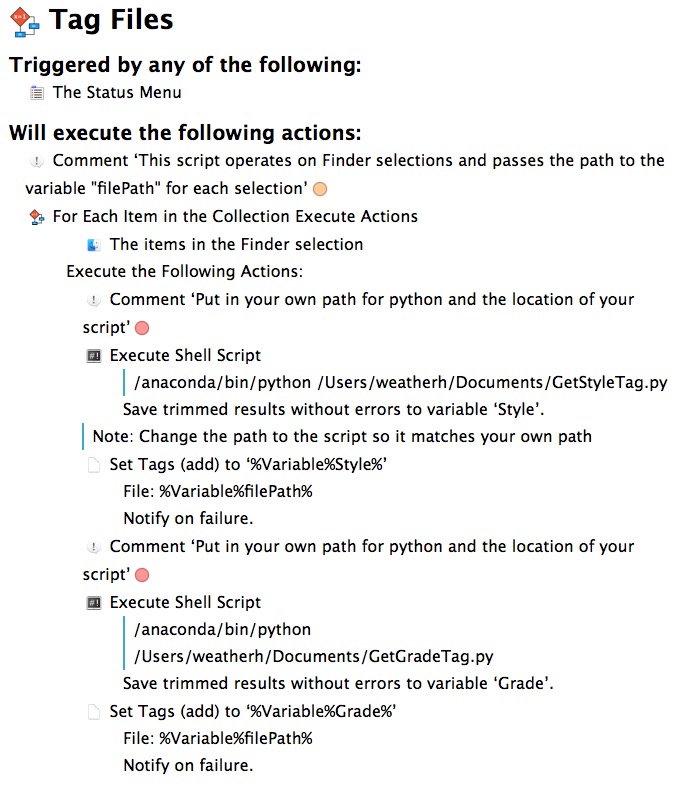
The macro starts with Keyboard Maestro’s “For Each Item in Collection” action. This is a way for KM to loop over files in a folder or selection. For each file selected when the macro is run, it executes two shell commands, the result of which is saved as a new variable.
You might notice that the shell script commands in Keyboard Maestro explicitly call Python installed under Anaconda. If I were running these commands at the Terminal I wouldn’t need to worry about that. But over there years I’ve learned that applications like Keyboard Maestro don’t always have access to the PATH that I expect them to. So I’m explicit now.
Back to the macro. Each shell command executes a Python script. One script pulls out the YAML header value for the beer style and the other pulls out the value for the beer grade. Hurray for structured text files!
Here’s the first script named “GetStyleTag.py”
:::Python
#!/anaconda/bin/python
import markdown
import os
import sys
reload(sys)
sys.setdefaultencoding("utf-8")

# Get the Keyboard Maestro variable
filePath = os.environ.get('KMVAR_filePath')
try:
	myFile = open(filePath, "r")
	rawText = myFile.read()
	myFile.close()
	# Process with MD Extras and meta data support
	md = markdown.Markdown(extensions = ['extra', 'meta'])
	# Get the html text
	html = md.convert(rawText)
	## extract the tags but keep them as a list
	if md.Meta:
        # print md.Meta
        if 'style' in md.Meta:
            headerTags = md.Meta["style"]
            print headerTags[0]
            sys.exit(0)

## This is bad form, but if there is no Markdown meta field, just return a failed match
except AttributeError:
	sys.exit(1)
except Exception, e:
	sys.exit(1)
The Keyboard Maestro “For Each Item in Collection” loop creates a variable for each selected file. That variable contains the file path. The nice thing about Keyboard Maestro variables is that they are really environment variables on macOS. That means Python can read it with this line:
:::Python
filePath = os.environ.get('KMVAR_filePath')
Once the Python script has the file path, it uses the Markdown module for Python to grab the YAML headers.2 It then looks for the “style” header and pulls out the value. By “printing” the first value it finds for the style header, the script passes the value on to the next Keyboard Maestro action in the macro through a new variable.
Keyboard Maestro uses it’s action to set the tags on the final currently being processed in the macro data stream. This is the entire reason I used KM. The tags are set correctly by the action and the files import into DEVONthink without issue.
Here’s where I end up on the Mac:
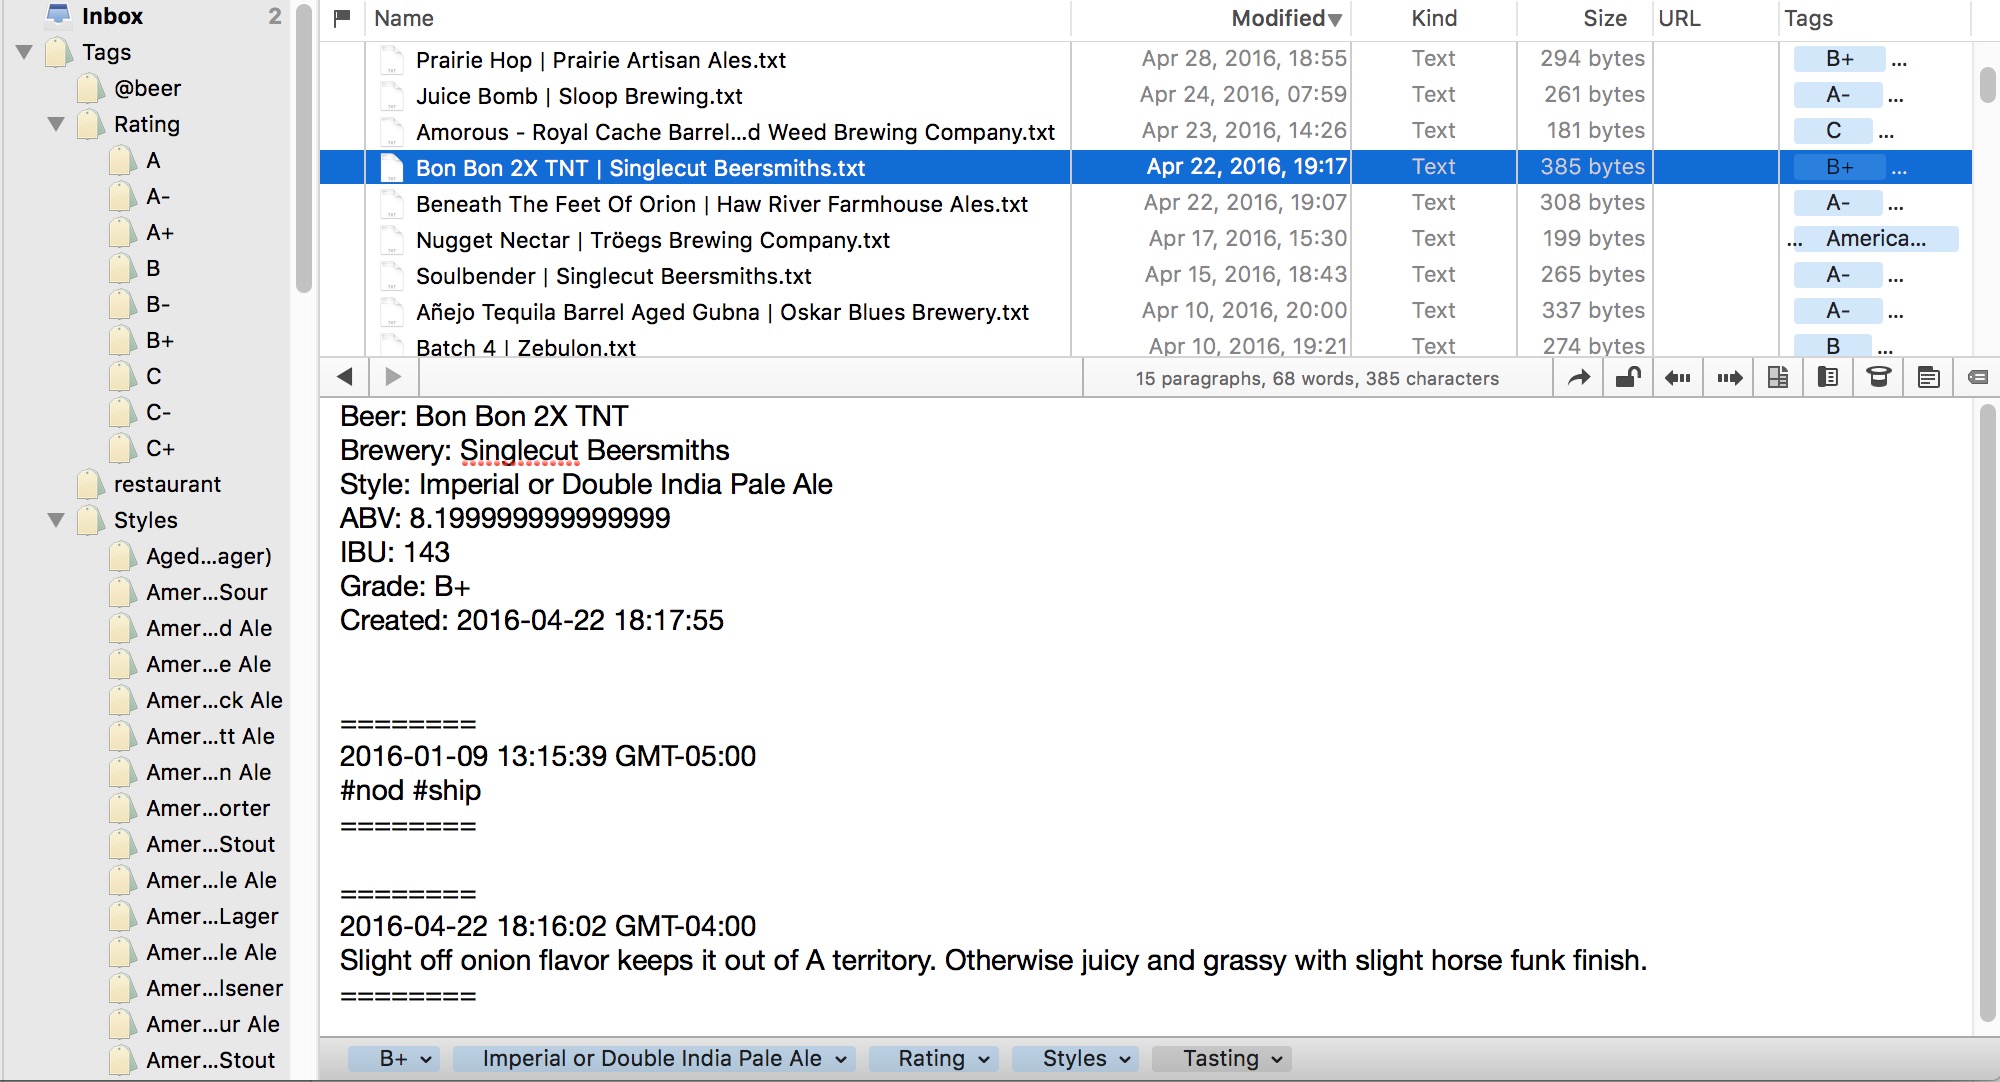
The text files are well formed. The creation dates match the date of the original note in TapCellar. Finally, all of the tags on the files means I can easily filter the collection by grade or by style.
On iOS, the tags also help for visualizing the grades in a large list of files:
iOS also gets the nice feature of filtering by style.
Capture on iOS
I have two modes for capturing notes on iOS, regardless of topic: Photo and text. The note may be about a beer I just had with my friend, or it could be the name of a good local plumber.3 For a photo note, I just go to DEVONthink and capture a “media” note then snap a picture. If I want to add markup, I start in Annotate and then send it to DEVONthink. Either way, I can still add tags, labels and comments with photos.
For text notes, I always start in Drafts on iOS.
I use a Drafts script that prompts for a few basic questions and I highly recommend checking out Tim’s post about Drafts and Workflow. He has a similar approach.
The first Drafts action fills in some basic text, include the first line that will be used as the file name in DEVONthink To Go. I then add notes and time stamps myself.
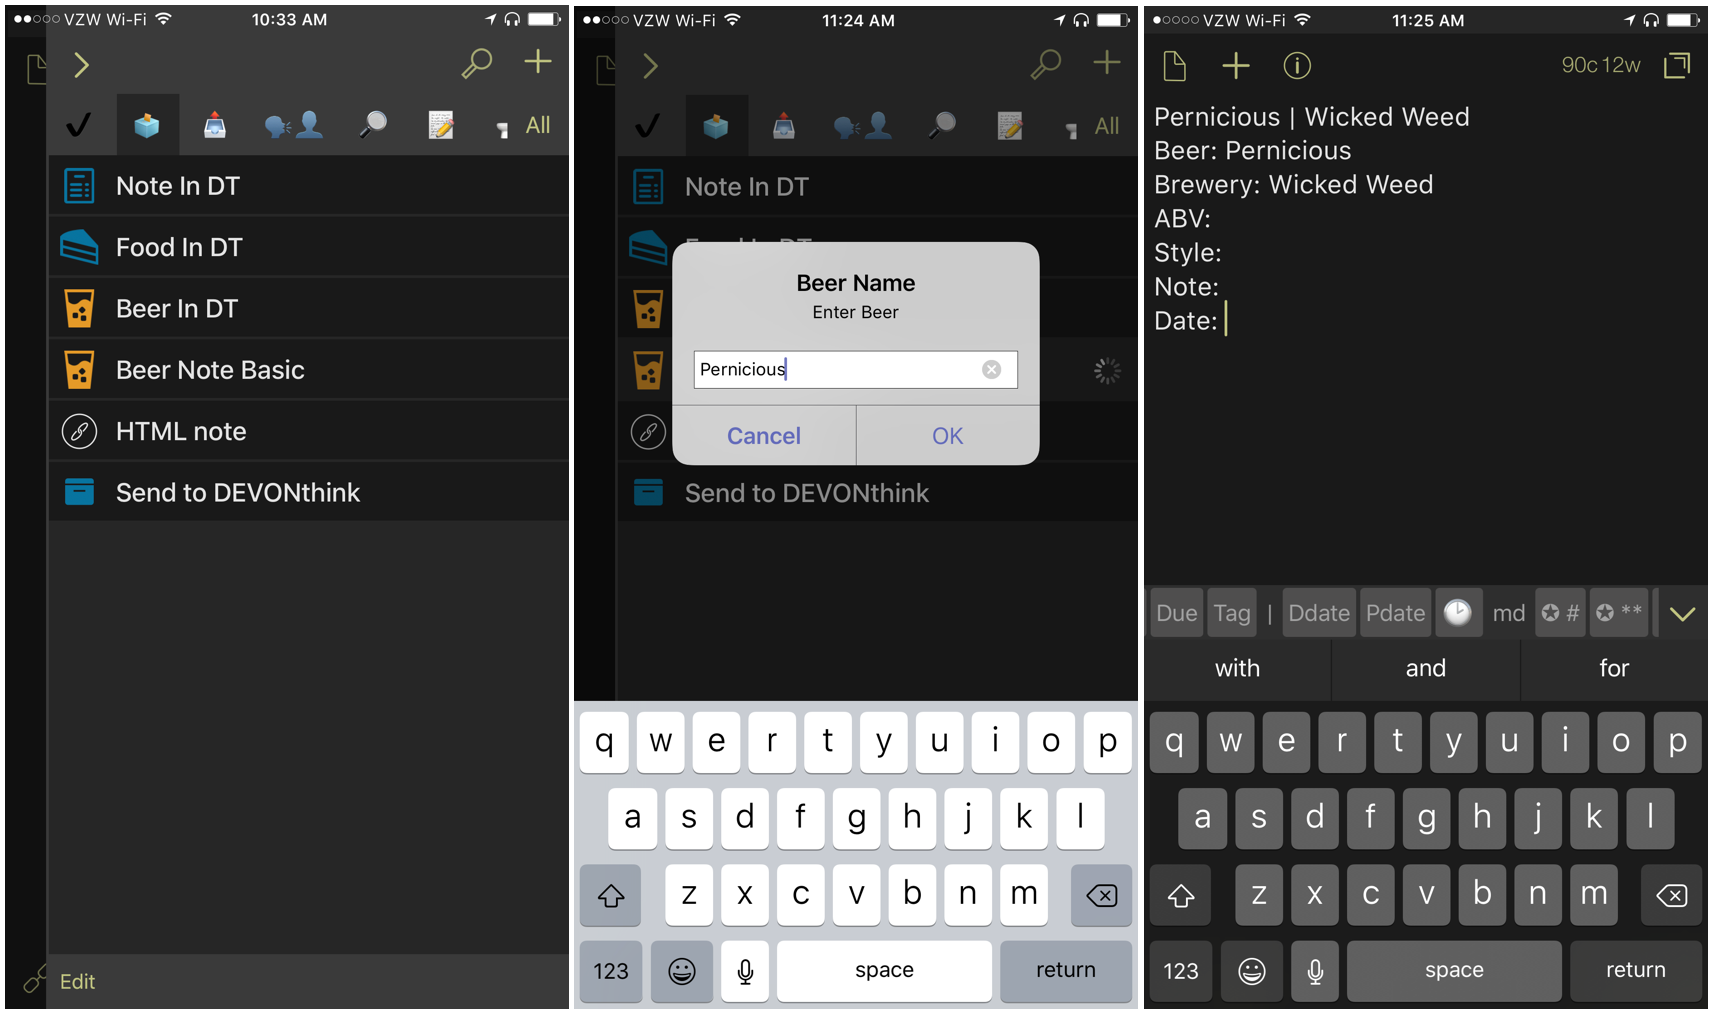
The nice thing about Drafts is that I can just capture the note quickly and leave it in the Drafts inbox for later. I can get back to the “work” at hand. Later, I can execute a Drafts URL action to send the note to DEVONthink. Here’s my URL. If you use this, then replace the destination parameter with the GUID for your prefered folder in DEVONthink.
:::text
x-devonthink://createText?title=[[title]]&[[date]]&text=[[body]]&destination=503BF420-95CE-4B72-A248-115B223FE04E
I still have to manually assign the tags in DEVONthink. I can’t wait until they support tags, labels, and comments in their URL scheme. Since the note text captures everything, I can always add the tags later.
That’s about it. A pretty simple idea that turned out to be very complex but fun project. I’m very happy with the final results. All of my tasting notes are in DEVONthink as plain text files. Search works great even if I can’t do fancy database-like sorting and filtering. The tags in DEVONthink help but I’m careful to also capture the tags as text where I possible.
-
Here are a few other ways to do this, that I also considered: Dropbox folder, Apple Notes, Synology Notes, iCloud Drive. ↩︎
-
There are a lot of very “cool” extensions in this package. I’m using the meta data extension. ↩︎
-
Seriously, if you can find good contractors you should consider yourself very lucky. I’m jealous. ↩︎
